
In the previous project we got multiple render passes working. In this project, we take advantage of it by implementing a reflection plane.
Mipmapping + cubemap support has also been added!
Reflections and Mipmaps
In the previous project we got multiple render passes working. In this project, we take advantage of it by implementing a reflection plane.
Mipmapping + cubemap support has also been added!
I'm a little late to the game, but I've finally figured out how to get mipmapping to work with Vulkan
If you're used to OpenGL like me, it might be strange to initially find out that Vulkan does NOT generate your mip map levels on the fly. But that kinda makes sense. Vulkan is trying to save you time where it can, and generating mipmaps for all of your textures doesn't come for free.
Instead, Vulkan wants you to generate your mipmaps offline, and then upload all levels at once.
Generating mipmaps offline can be done using PVRTexTool by Imagination Technologies, which can be downloaded here: Link to PVRTexTool
In addition to mipmapping, PVRTexTool can compress your textures for you, or color your different mipmap levels which can be helpful when debugging
Note that when you save your mipmapped image, PVRTexTool only gives you 3 possible output formats: .pvr, .dds, and .ktx. I'm personally using .ktx, which is a texture format developed by Khronos, and can be easily read in using the GLI library which can be found here: Link to OpenGL Image Library
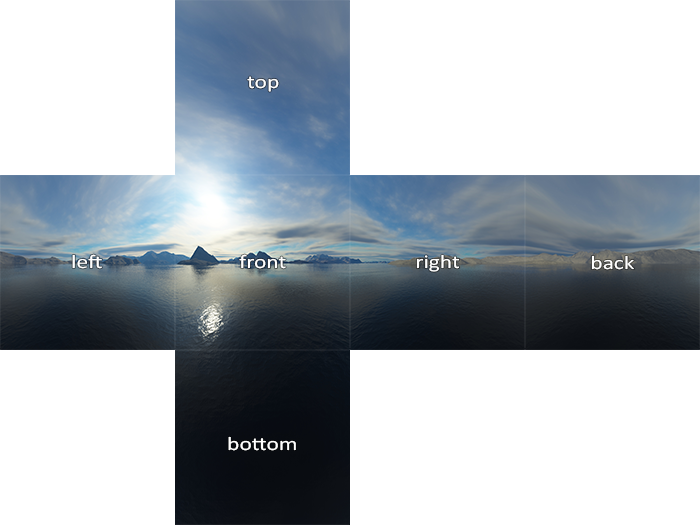
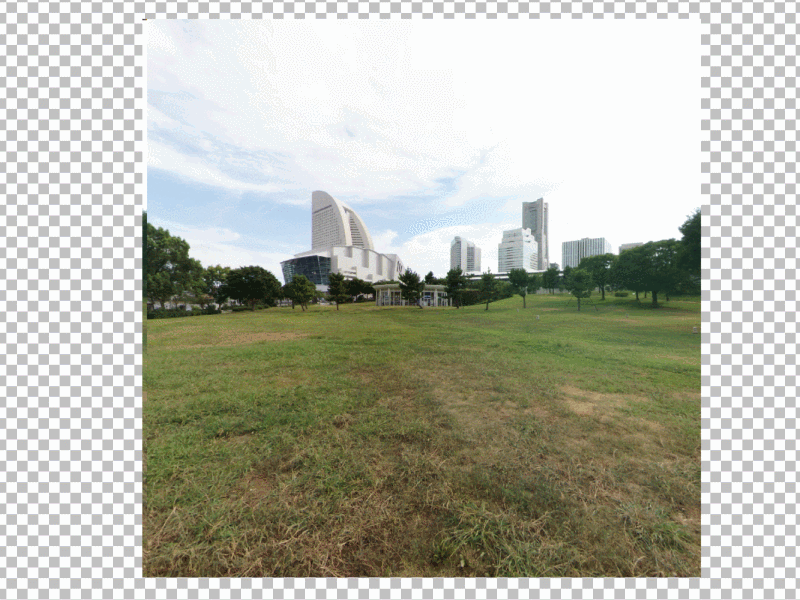
Many graphics applications will use something called a "skybox" to give a scene some atmosphere or indirect illumination. These skyboxes can be implemented in a couple ways, but a tried and true approach is to implement them using cubemaps.
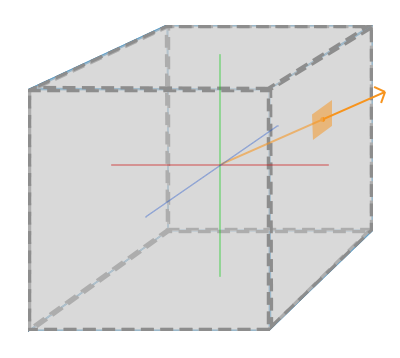
A cube map is essentially a cube with 6 faces, and can be sampled using a directional vector, shown as an orange arrow in the picture below:
I can use this cubemap to give my scene a background, but I can also use it to fake some reflections:
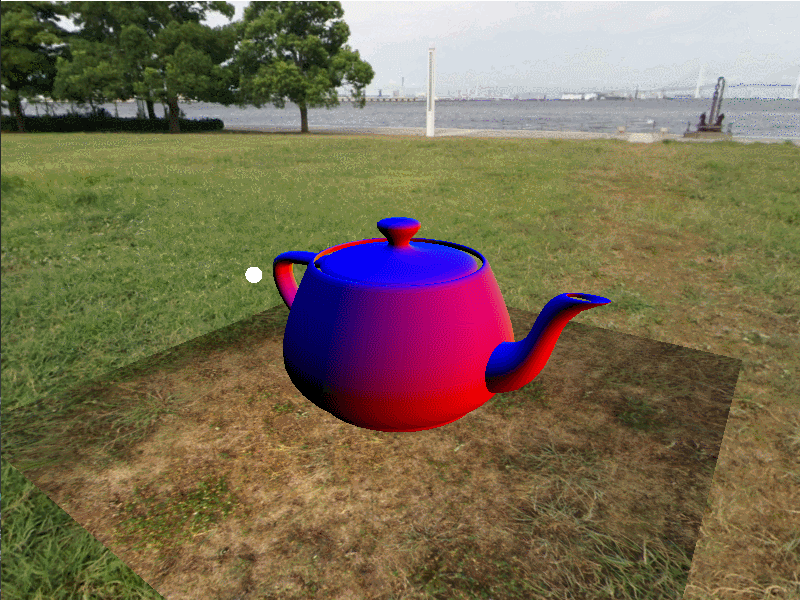
Cubemap reflections are good at capturing general reflections, but aren't 100% accurate.
(For example, the teapot above doesn't reflect the ground below it.)
I could capture the ground below the teapot in the teapot's reflection by adding a renderpass which renders the 6 faces of a cubemap from the center of the teapot (not including the teapot), and then sampling from that. But reflections still won't line up perfectly. This approach might be good enough for your application though.
There's a cool trick we can do to reflect objects in a mirror, which isn't actually that hard to implement.
We can reflect objects accross a plane using the following matrix (where P is a point on the mirror plane and V is a vector perpendicular to that plane):
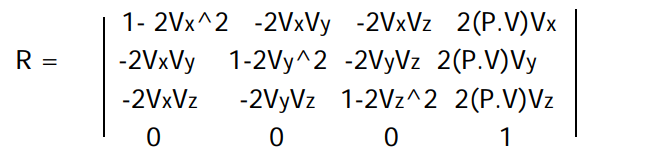
If we create a copy of each object we want to see behind the mirror, and transform them by this matrix, this is the effect:
Note that this matrix will change the winding order of your mesh! If you're using counter-clockwise front faces, only the back faces of the reflected mesh will show!
Also note that the camera view position will need to be flipped as well. In gif I showed above, I forgot to reflect my view matrix, so the camera position in my reflection shader is incorrect and my reflections are off!
Now, another problem that you might notice is that we don't actually have a "mirror" plane. We just have a set of mirrored objects being drawn. To fix this issue, we'll render only the reflected objects in a prerender pass from the same camera position! (passing the reflected camera position into our shaders for correct illumination and reflection results)
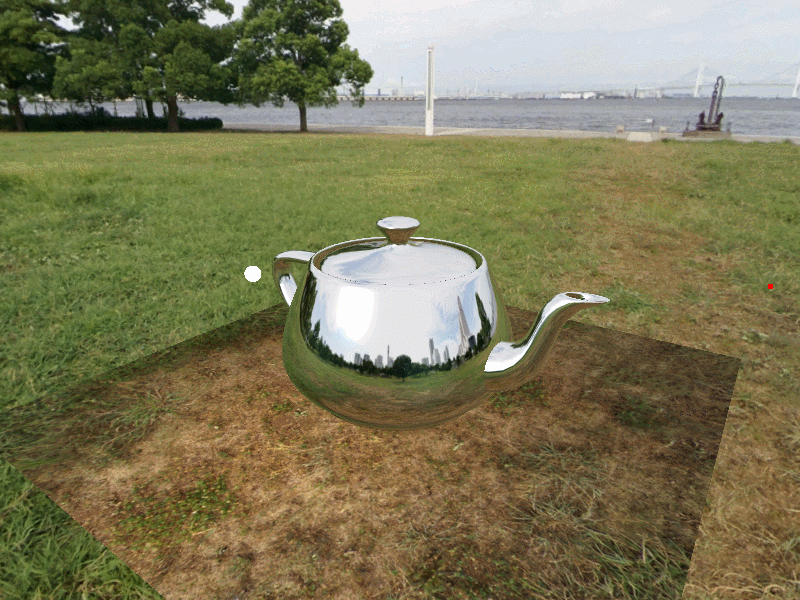
This is what the first pass looks like

Since our first render pass is saved to a texture, we can sample from that texture to constrain the reflection to our reflector object.
A key thing to note is that the first render pass's texture lines up one to one with our final render pass behind our desired mirror. So we can use the screen space position of our reflector's fragments to sample from our first render pass texture when we're doing the second render pass.
Here I'm rendering the reflector (just a flat plane), where red indicates the X texture coordinate and green represents the Y texture coordinate. Note that on the top left, the plane is black, regardless of the camera position.
Finally, we sample from the first renderpass's generated texture in the second pass, using the texture coordinates we computed above
C++, Visual Studio 2017, CMake, Vulkan, GLFW, GLM
Intel HD Graphics 620, Intel Core i7 - 8500U CPU @ 4.0GHz, 16GB of memory
Nvidia GTX 1070